How to make a cheap WiFi Temperature/humidity sensor
What it is all about?
Here is a small story how I have created a simple WiFi sensor that records temperature and humidity.
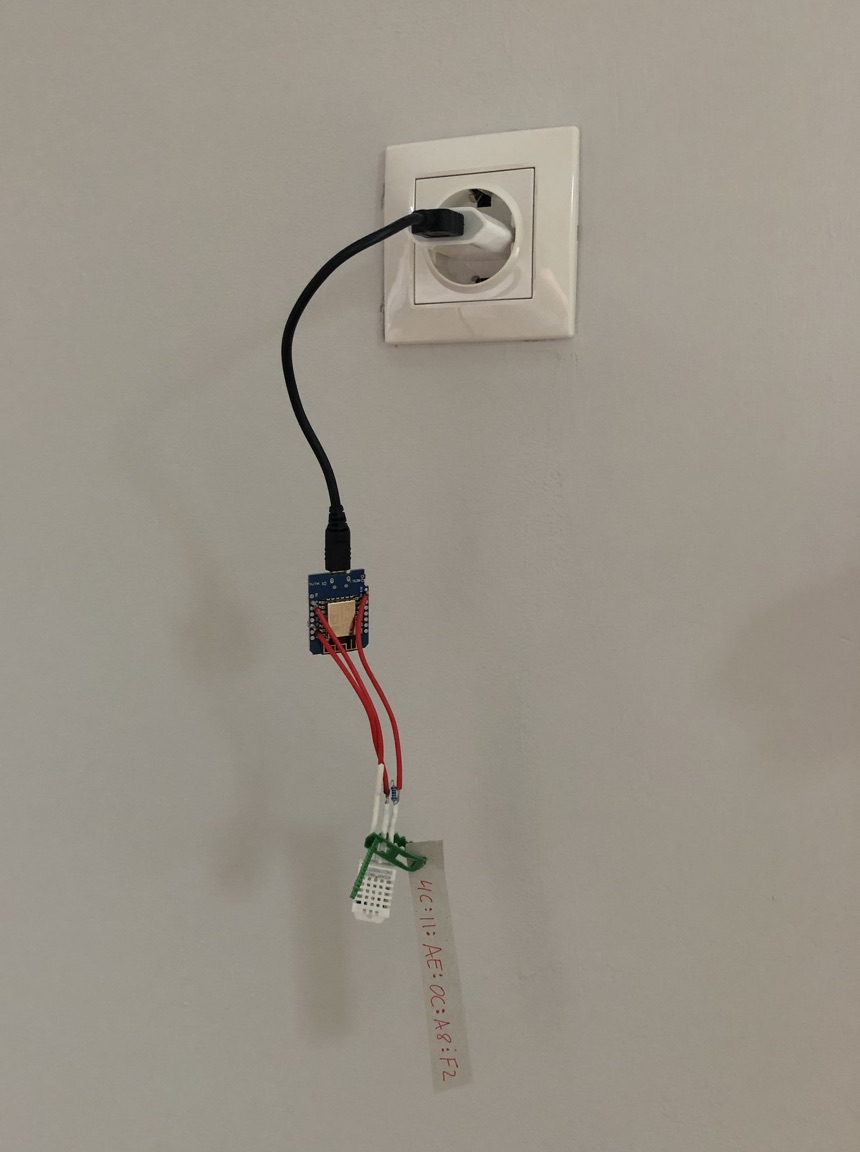
You plug it into the wall power socket, it connects to your WiFi network and twice a minute sends data to the server.
If you make it yourself then the price of the device is less than 10 USD. (but you also need a USB cable and USB Power Adapter)
In this text I'm describing both the hardware and the software parts of the device.
As a result I have created a working solution. The data are collected and it is possible to check the graph with history values. But everything can be improved.
The history
I have several YouTube channels that I sometimes watch. One of them is Chillichump. The man lives near London, he has a greenhouse in his garden where he plants hot peppers to make hot sauce. The channel is really great. You can feel that the Author loves what he is doing. The story is interesting and the videos are of a high quality.
The main topic of the channel is about hot peppers. How to plant them, how to grow, how to garden, how to ferment and how to cook. But sometimes he creates videos about some tech devices that he uses to simplify or to make better the process of creating hot sauce.
In the beginning of 2019 the author has created the video how to create temperature and humidity sensor that can send data to the server. In his greenhouse there are a lot of devices, there are sensors, cameras, the automatic watering system. He can monitor and manage it remotely.
This is his video — https://www.youtube.com/watch?v=yqmOp7m4szA "Easy web-enabled Temperature and Humidity monitoring for your greenhouse".
It looks like it is very simple to create such a sensor. You need to take several components, solder them together and as a result you get a working sensor that can send data over WiFi.
And I have a task for such sensors. In the country house there is a problem with a very high humidity. It is clear that there is a problem without any sensor, but I would like to install sensors to get the exact numbers for the humidity to find out how effective are these measures I'm using to solve the high humidity problem.
So I have decided to recreated everything that is shown in the video: to solder sensors and to get data from them.
Components purchase process
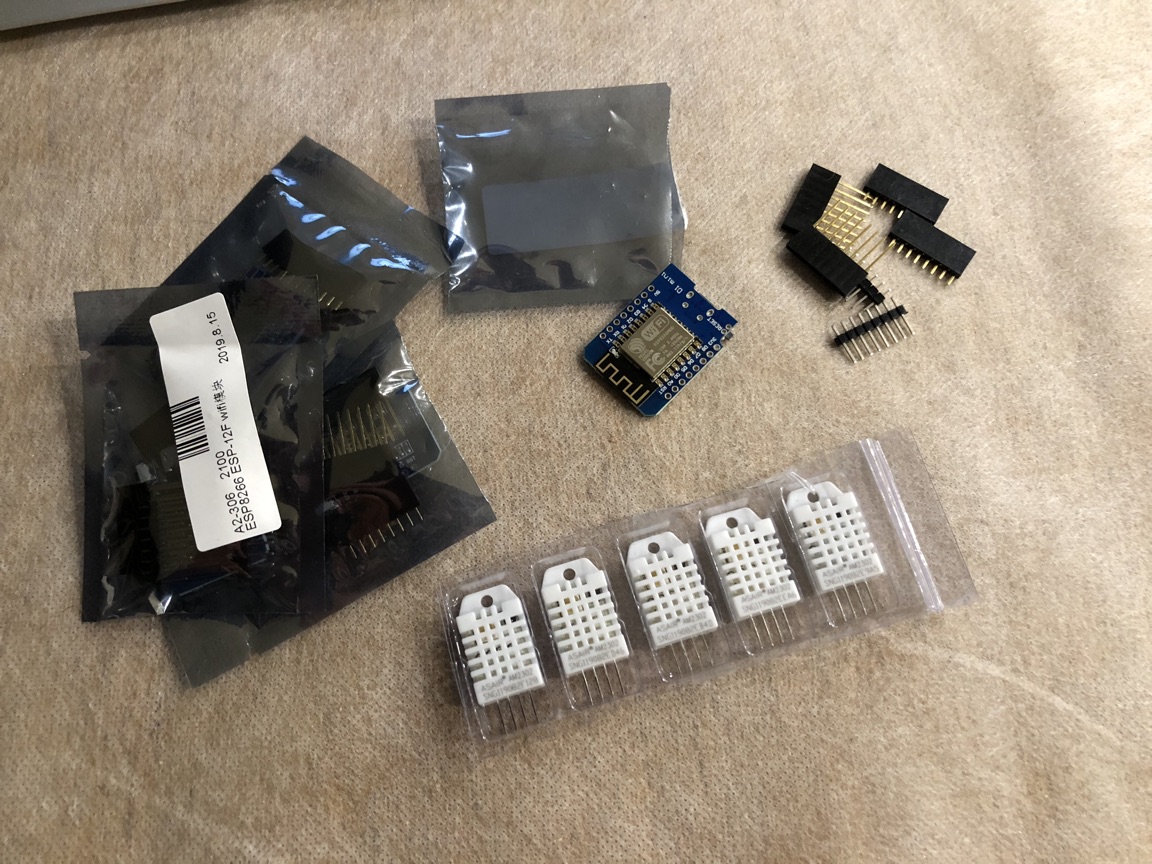
The Chillichump Author in his video is using sensor AM2302 and Arduino compatible device Wemos D1 Mini.
I have orders on AliExpress things that are very similar:
- Sensor — https://s.click.aliexpress.com/e/_d8Cfw2F (the price was $2.44 for one device)
- Computer based on ESP8266 with build-in WiFi — https://s.click.aliexpress.com/e/_dVV7rc5 (the price was $2.35 for one device)
I have ordered and payed at August 13, and at September 2 I have recieved my purchases. So, it took something about 20 days.
I haven't ordered but to create a working device you need some other components:
- Resistor 10k ohm
- Micro USB cable
- USB power adapter
And you also need some wires and solder. And you need some tools. At least you need soldering iron and wire cutters.
Connection instructions
AM2302 sensor has 4 pins. The 3 are used:
pin1 - power 3v3
pin2 - data
pin3 - not used
pin4 - ground
D1 Mini has a lot of pins, in this project 3 are needed:
pin8 3v3 — power
pin15 G - ground
pin20 D1 — GPIO5
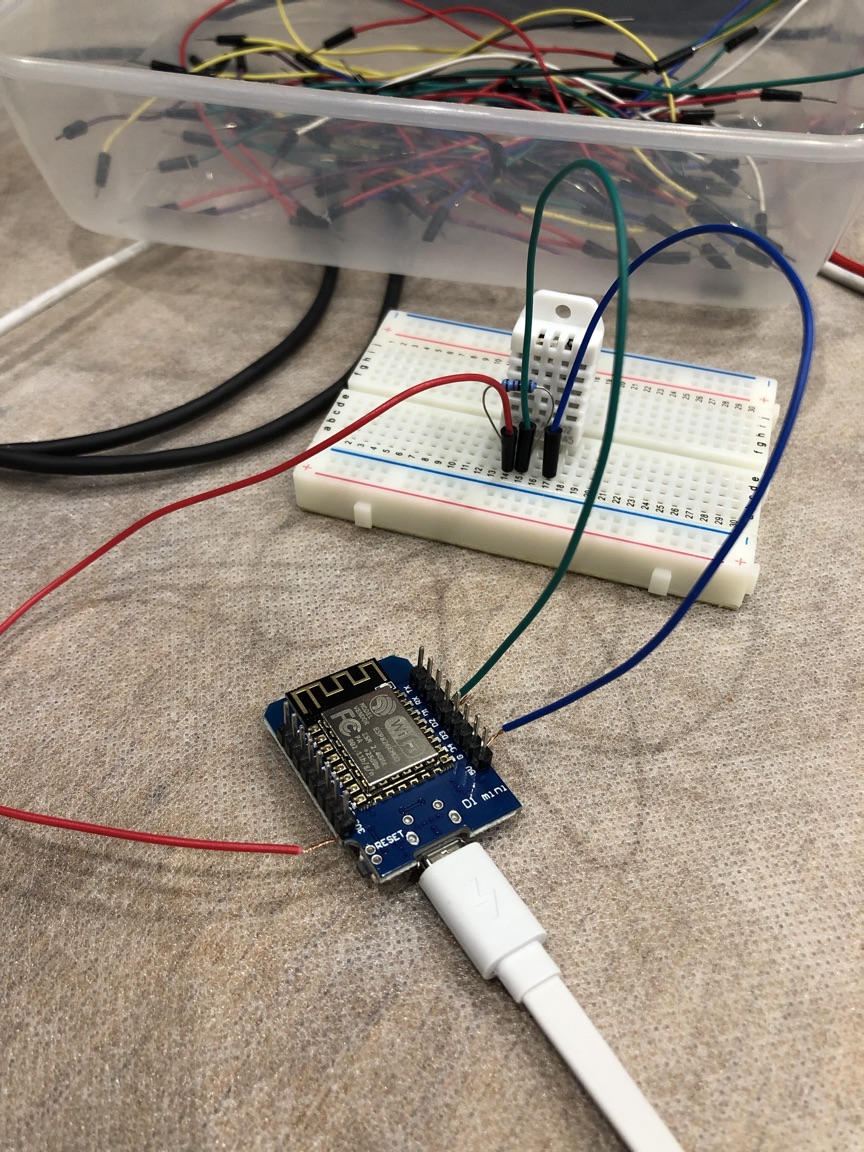
Everything straightforward. The power from D1 Mini is connected to power on AM2302, the ground is connected to ground, GPIO5 on D1 Mini is connected to data on AM2302. But you also need to add 10k resistor between pin1 and pin2 on AM2302.
I've started with creating the device on the solderless breadboard.
First version of software
Wemos D1 Mini compatible device has micro USB. It is powered from it.
But in case USB is connected to notebook it is possible to upload code to the device and the device will be able to send data to notebook.
There is a free software to write code and to upload it to the device Arduino IDE.
In the Arduino IDE you need to choose board "LOLIN(WEMOS) D1 R2 & mini".
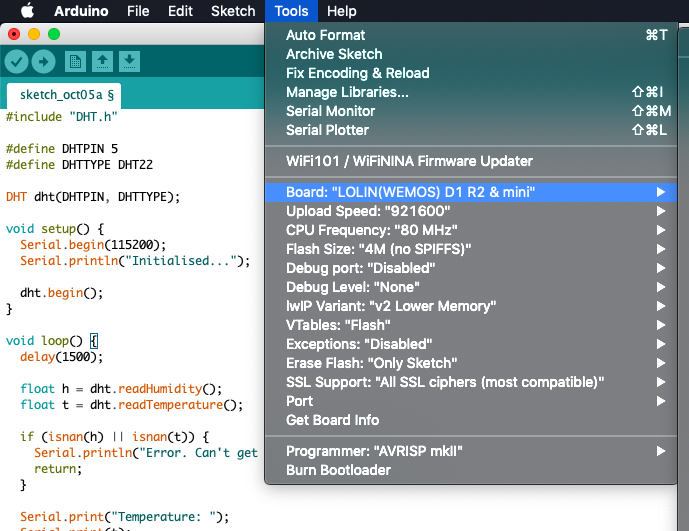
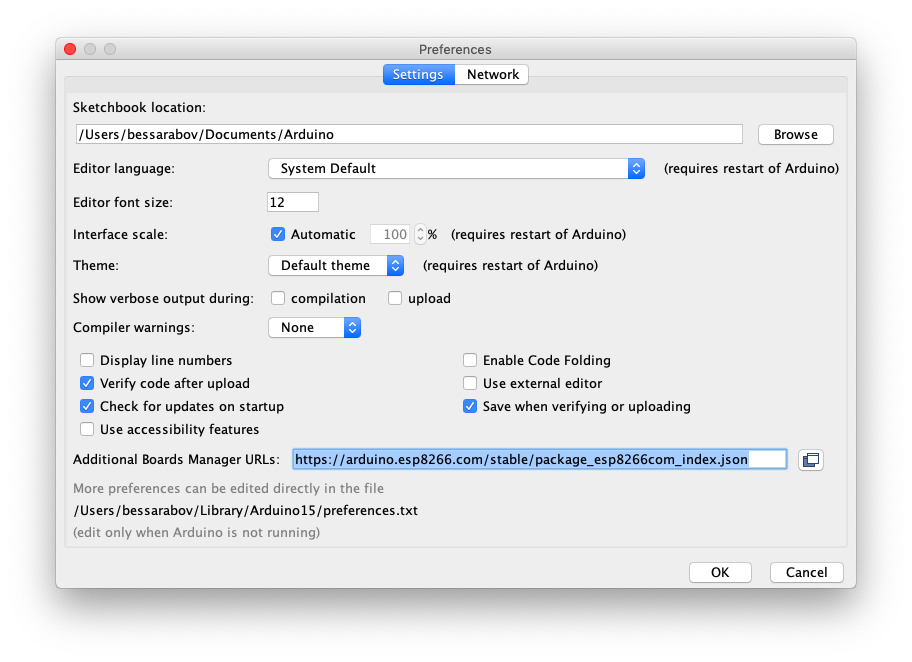
Out of the box in Arduino IDE that board is not available. To get is you need to add the following url to the setting "Additional Boards Manager URLs":
https://arduino.esp8266.com/stable/package_esp8266com_index.json
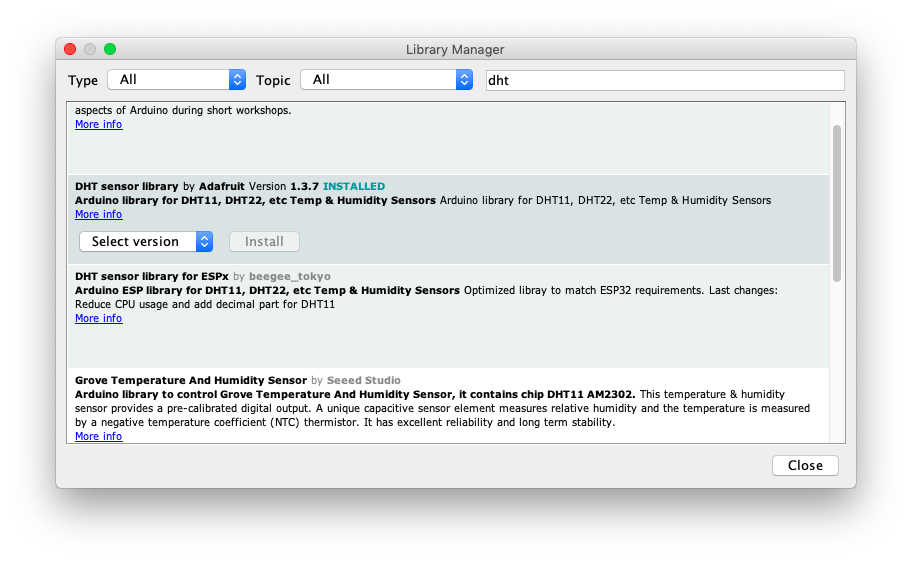
The other thing you need is to add "DHT sensor library" to Arduino IDE. Here is a GitHub link https://github.com/adafruit/DHT-sensor-library.
After you have the board and the library installed in the IDE it is possible to write code that reads data from sensor and output it. In this version of code WiFi is not used the data are send to the notebook via USB.
#include "DHT.h"

#define DHTPIN 5
#define DHTTYPE DHT22

DHT dht(DHTPIN, DHTTYPE);

void setup() {
  Serial.begin(115200);
  Serial.println("Initialised...");

  dht.begin();
}

void loop() {
  delay(1500);

  float h = dht.readHumidity();
  float t = dht.readTemperature();

  if (isnan(h) || isnan(t)) {
    Serial.println("Error. Can't get humidity/temperature.");
    return;
  }

  Serial.print("Temperature: ");
  Serial.print(t);

  Serial.print(" ");

  Serial.print("Humidity: ");
  Serial.print(h);

  Serial.println();
}
Next you need to compile and upload the code to the device. Then you can open Serial Monitor in the Arduino IDE and check that every 1.5 seconds there is a line with temperature and humidity values.
Assembling device
We have created device on the breadboard and the simple version of code shows that the device is working. The next thing is to solder device.
I was using stranded wire with 0.75 millimeters diameter, but it turned out that it is too thick and I have to remove some small wires from it. Because of that the assemblance process took more time. I was using heat shrink tubing to hide the contacts on the AM2302, but because there is also a resistor the tubing was hard to use.
I was recording video how I solder. Then I have created a timelapse and I have uploaded it to Youtube. One hour of soldering in one minute. https://www.youtube.com/watch?v=w4MWFH6uB1g
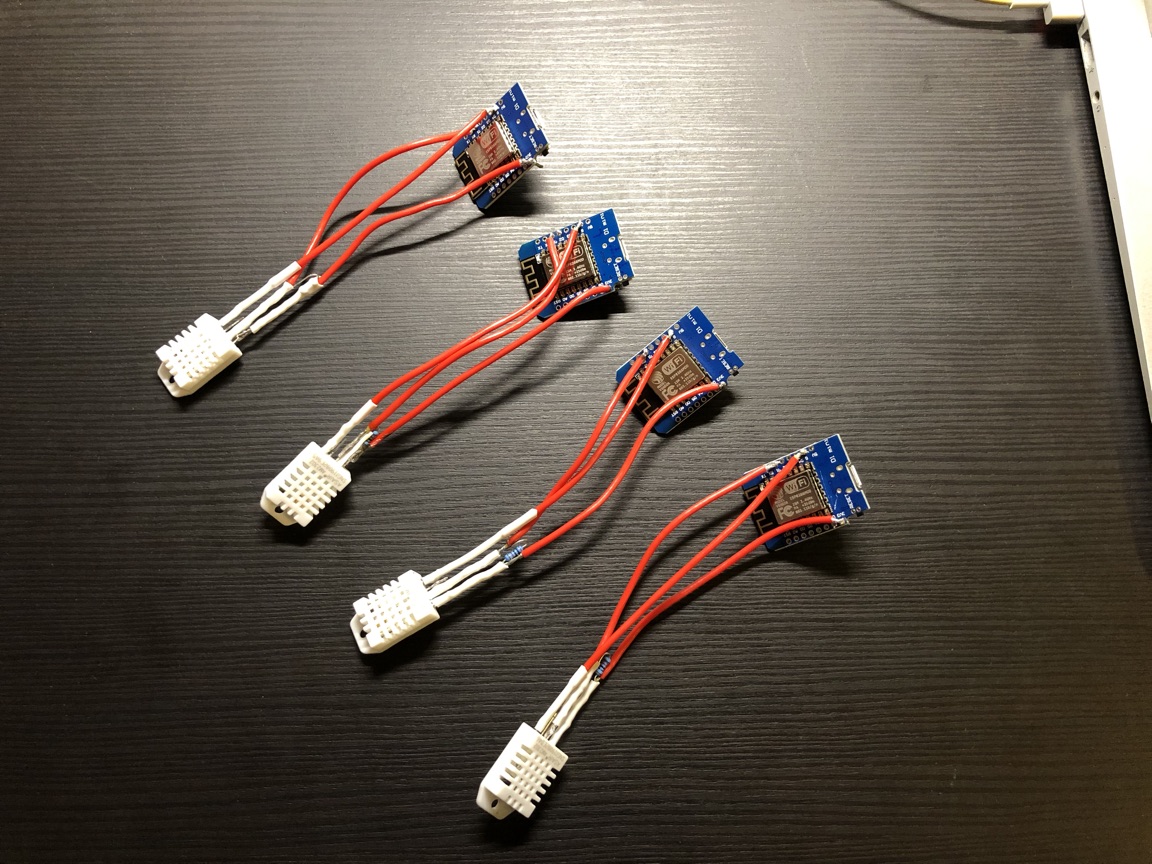
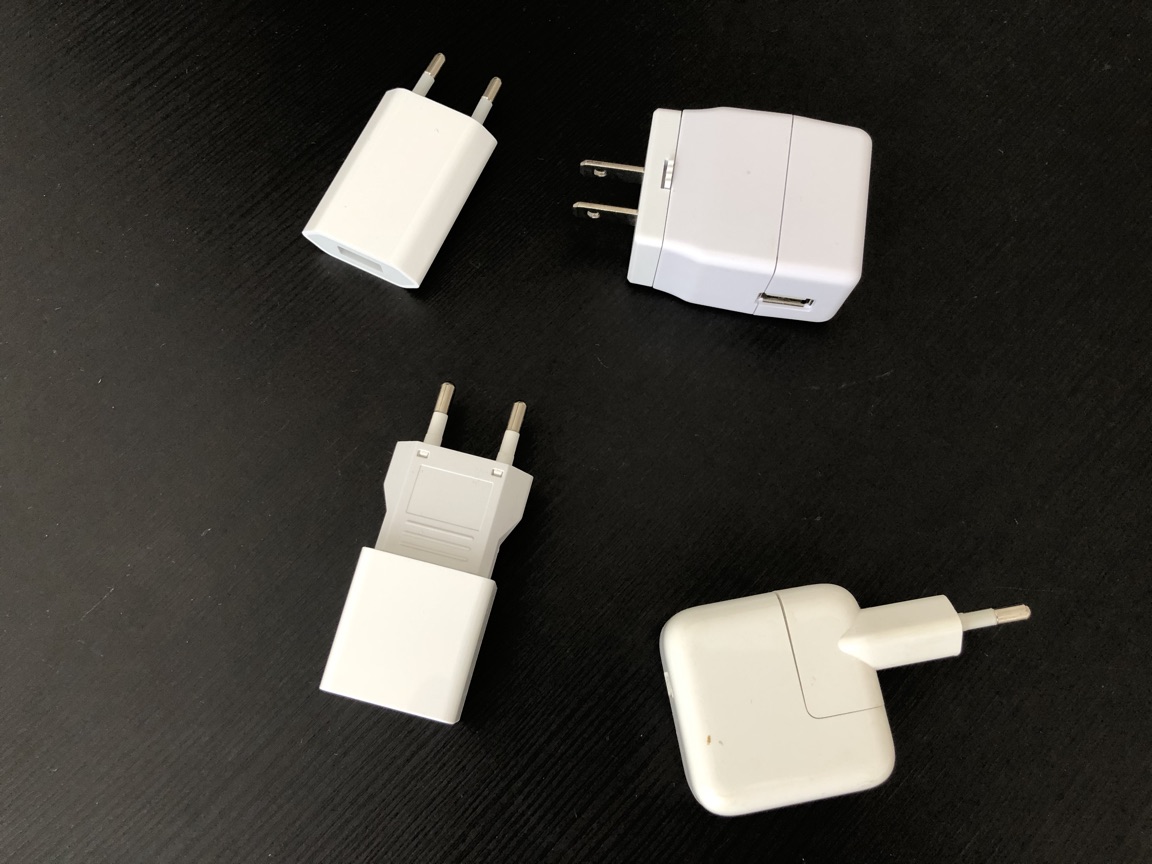
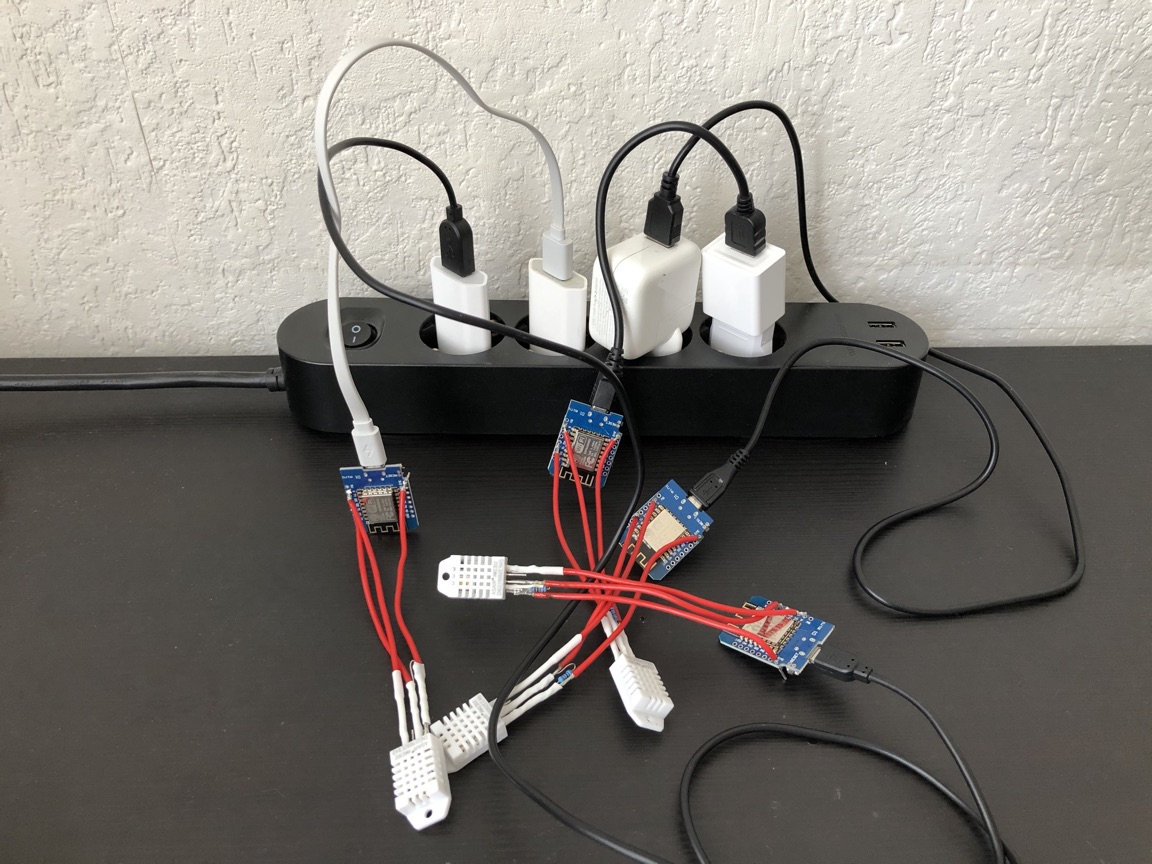
After I have soldered the devices I found out that I have forgotten to buy USB cables and USB power adapters. But I was happy enough to find all the things I need in my box filled with computer stuff. All the cables and power adapters are different, but they do the job.

Sending data to the server with WiFi
At this moment I have a soldered devices and I have a code that can read measures from the device and output it on notebook via USB.
But the idea of this sensors it to make them autonomous. I don't want it to be connected to notebook with USB. I want the USB cable from the devices to be connected to USB power adapter, and the power adapter is plugged to the wall socket. The device connects to WiFi and sends data to server.
After I have spend some time reading documentations and code examples I have written the code that does what I want. The device is using WiFi and sends data to the server using POST method in HTTP protocol
The the message body the device is sending JSON that looks something like this:
{"t": 13.30, "h": 69.70, "mac": "4C:11:AE:0D:7E:FE"}
In the request body there is not only information about temperature and humidity, but there is also a device MAC address. This address should be unique for the different devices and it can be used to distinguish one device from the other.
The code is working, but in this code I don't like that use strings concatenation to create JSON. The better way to do it is to use some well written library
In this code you need to change strings "my_wifi_name", "my_wifi_password", "http://example.com/endpoint". You need to specify real data.
#include <DHT.h>
#include <ESP8266HTTPClient.h>
#include <ESP8266WiFi.h>

#define WIFI_NAME "my_wifi_name"
#define WIFI_PASSWORD "my_wifi_password"

#define SERVER_ENDPOINT "http://example.com/endpoint"
#define DELAY_SECONDS 30

#define DHTPIN 5
#define DHTTYPE DHT22

DHT dht(DHTPIN, DHTTYPE);

void setup() {
    Serial.begin(115200);

    WiFi.begin(WIFI_NAME, WIFI_PASSWORD);

    while (WiFi.status() != WL_CONNECTED) {
        Serial.println("Connecting to Wi-Fi...");
        delay(500);
    }

    Serial.println("WiFi connected");
    Serial.print("IP address: ");
    Serial.println(WiFi.localIP());

    Serial.print("Mac address: ");
    Serial.println(WiFi.macAddress());

    dht.begin();
}

void loop() {
    delay(DELAY_SECONDS * 1000);

    if (WiFi.status()== WL_CONNECTED) {

        float t = dht.readTemperature();
        float h = dht.readHumidity();

        if (isnan(t) || isnan(h)) {
            Serial.println("Error. Can't get temperature/humidity.");
            return;
        }

        char body[200];

        char mac[100];
        String stringMac = WiFi.macAddress();
        stringMac.toCharArray(mac, 100);

        sprintf(body, "{\"t\": %.2f, \"h\": %.2f, \"mac\": \"%s\"}", t, h, mac);
        Serial.println(body);

        HTTPClient http;

        http.begin(SERVER_ENDPOINT);
        http.addHeader("Content-Type", "text/plain");
        int httpCode = http.POST(body);
        String payload = http.getString();
        Serial.println(httpCode);
        Serial.println(payload);

        http.end();
    } else {
        Serial.println("Error in WiFi connection");
    }
}
I have checked how this code works in three situations.
- The devices is switched off and on (in case of power failure). After the device is on it automatically starts sending data
- The server has become unavailable. When the server is back again it starts getting new data
- The WiFi is unavailable. When Wifi if working the device reconnects and start sending
In all these 3 exceptional situations the code is running correctly. When the problem disappears everything starts working automatically. You don't need to reboot device or do something else to make it work.
Server software
At this moment the hardware part is ready and there is soft on the device that can send data with HTTP protocol POST method.
The next thing that is needed is a web server that can accept such requests, save the data and visualise it.
To solve this task I've written a small web service and I have put it into docker image.
Here is the source code — https://github.com/bessarabov/oak-hollow.
This is a sample how to use "curl" to send data to that service:
curl -X POST -d '{"t": 24.30,"h": 60.80,"mac": "AA:BB:CC:00:11:22"}' http://127.0.0.1:3527/api/dot
The sensor is sending only three pieces of information. The MAC address, temperature value and humidity value. Server receives that values but also add current date time to that data and saves it to file and also to sqlite database.
In the same repo there is also a microservice that visulises the data using JavaScript library Cubism.js.
Here is a short video how the data change when I heat the sensor with a lighter. For this video I have changed the code to send data every 2 seconds. https://twitter.com/bessarabov/status/1177932537601183752.
I have created 4 devices. I have put them all near each other and I have turned them on. I was expecting that all of them show the exact same numbers, but I was wrong, the values differ.

Production
So. I have hardware. On the hardware there a code that reads temperature/humidity data and send it to web service. And I have a web service that accepts that data and save it.
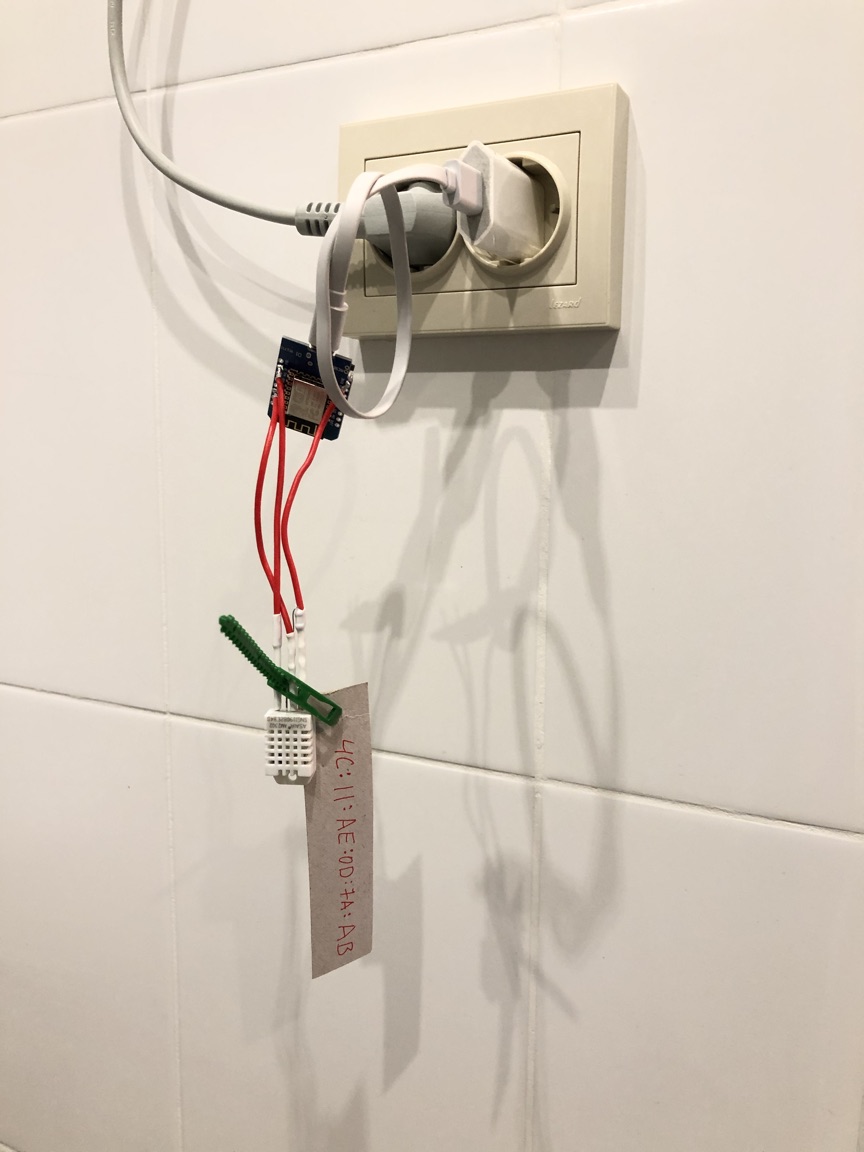
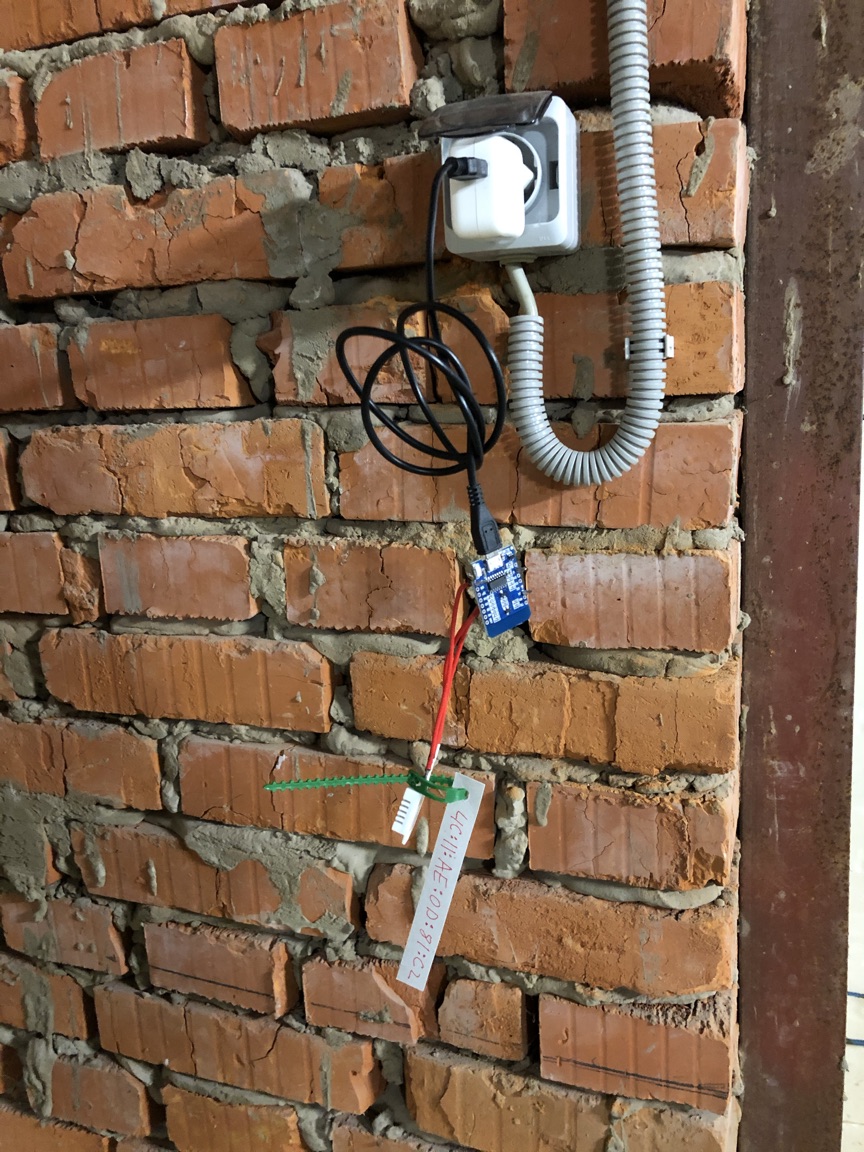
The last thing is to install that sensors:
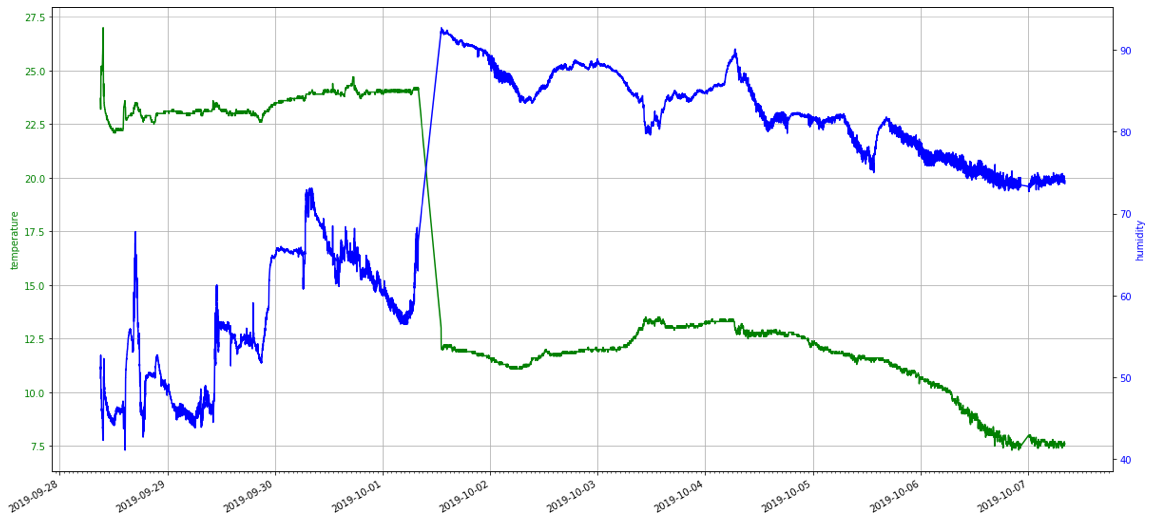
The web service is saving data to files. I took Jupyter and I have written some code to graph temperature and humidity.
import os
import numpy as np
import pandas as pd
import matplotlib.pyplot as plt
import matplotlib.dates as mdates
import matplotlib.cbook as cbook

f=[]
df_list = []

for root, dirs, files in os.walk("oak-hollow/"):
    for filename in files:
        if filename == '4C:11:AE:0D:81:C2.jsonl':
            print(filename)
            full_filename = root+'/'+filename;
            f.append(full_filename)

for filename in sorted(f):
    df_list.append(pd.read_json(filename, lines=True))

df = pd.concat(df_list)

T = df.iloc[:, 2].values.reshape(-1, 1)
H = df.iloc[:, 0].values.reshape(-1, 1)

X = df.iloc[:, 3].values.reshape(-1, 1)

from pandas.plotting import register_matplotlib_converters
register_matplotlib_converters()

plt.rcParams["figure.figsize"] = (20,10)

days = mdates.DayLocator()
hours = mdates.HourLocator()
x_fmt = mdates.DateFormatter('%Y-%m-%d')

fig, ax = plt.subplots()

ax.set_ylabel('temperature', color='green')
ax.plot(X, T, color='green')
ax.tick_params(axis='y', labelcolor='green')

ax.grid(True)

ax2 = ax.twinx()

ax2.set_ylabel('humidity', color='blue')
ax2.plot(X, H, color='blue')
ax2.tick_params(axis='y', labelcolor='blue')

ax.xaxis.set_major_locator(days)
ax.xaxis.set_minor_locator(hours)
ax.xaxis.set_major_formatter(x_fmt)

fig.autofmt_xdate()

plt.show()
In the beginning that sensor was recording data in the apartment, but then I have moved it to the country house. The difference between that two places is very visible.
As an experiment I have installed Home Assistant and I have configured it to get data from that sensors. As I found out this is not very hard to do. Here is a sample configuration.yaml file:
sensor:
  - platform: rest
    name: dacha_sensors
    resource: http://server/oak-hollow/api/latest
    json_attributes:
      - 4C:11:AE:0C:A8:F2
      - 4C:11:AE:0D:7A:AB
    value_template: 'OK'
  - platform: template
    sensors:
      dacha_hall_temperature:
        value_template: '{{ states.sensor.dacha_sensors.attributes["4C:11:AE:0C:A8:F2"]["t"] }}'
        device_class: temperature
        unit_of_measurement: '°C'
      dacha_hall_humidity:
        value_template: '{{ states.sensor.dacha_sensors.attributes["4C:11:AE:0C:A8:F2"]["h"] }}'
        device_class: humidity
        unit_of_measurement: '%'
      dacha_base_temperature:
        value_template: '{{ states.sensor.dacha_sensors.attributes["4C:11:AE:0D:7A:AB"]["t"] }}'
        device_class: temperature
        unit_of_measurement: '°C'
      dacha_base_humidity:
        value_template: '{{ states.sensor.dacha_sensors.attributes["4C:11:AE:0D:7A:AB"]["h"] }}'
        device_class: humidity
        unit_of_measurement: '%'
Results
I'm very happy with the results. The sensor is pretty easy to create. The components are cheap. It works well. All the source code is available. That sensors can be integrated with anything.
But, frankly speaking, this solution is not a real product, but rather a prototype. Here are several things that should be done in some other way:
- The current device is a circuit board with some wires. It has to look prettier. The device should have some kind of case.
- To setup WiFi connection on the device you need to connect device to notebook with USB, then add WiFi name/password to the code, compile and upload the program to the device. It will be much better if there is a way to specify name/password without the need to connect to notebook with some soft. Here is one way of how it can be done. There is a button on the device. When you press it for 5 seconds the device is starting working in setup mode. In this mode the device acts as a WiFi router you can connect to. The name of the WiFi net is its MAC address (it is written on the device), the password is the serial number (it is also written on the device). After connection to the WiFi network you open 192.168.1.1 and there is a simple web interface where you can specify WiFi name/password. After the save the device starts working in normal mode, it connects to the specified WiFi and start sending data twice a minute. Maybe there should also be a led indicator, different colors and blinking patterns describe the errors/state.
- The data from the device is only saved on the server when everything is working as expected. If there is no internet, or the server is not available all the data in that period is lost. Maybe in such situations the device may store the data internally and when the connection is fixed it can send everything that wasn't send earlier.
- The device is speaking with the server using HTTP protocol without any login/password or token. Maybe it is better to use special protocol MQTT, but if protocol HTTP is used the server should work with https with auth token. For the current state of the code there is a relevant joke that the letter "S" in "IoT" stands for "Security".
9 october 2019